久しぶりにやると忘れてしまうので、個人用備忘録。
モデル作成・DB関連
モデルを作る
モデルの生成と、-aオプションはファクトリー・マイグレーション・シーダー・リクエスト・リソースコントローラー・ポリシーなどをまとめて生成
php artisan make:model Customer -aマイグレーションファイルを編集し、以下を入力する
未処理のマイグレーションを全て実行
php artisan migrateモデルのfillableに追記する
fillableプロパティは、マスアサインメント(Mass Assignment) という、複数のカラムに一度に値を設定する際に、どの属性を一括で変更できるかを指定する。このプロパティに指定したカラムのみが、ユーザーからの入力を受け取ることができる。
例えば、以下のようにfillableを設定した場合、nameとemailのみがマスアサインメントに対応し、それ以外のカラムには直接値を設定できない。
class User extends Model
{
  protected $fillable = ['name', 'email'];
}Laravel では、リクエストからのデータを直接モデルにインサートや更新する際に マスアサインメント を行うことができる。例えば、以下のようにユーザーが送信したデータを使って、Userモデルを更新する場合。
User::create($request->all());このとき、$request->all()に含まれるすべてのデータがUserモデルのカラムにマッピングされるが、fillableを設定していないと、意図しないカラム(例えばパスワードや管理者権限など)にも値が割り当てられてしまうリスクがある。
ダミーデータを作る
Factoryファイルに生成したいデータを記述する。
参考: https://www.wantedly.com/companies/logical-studio/post_articles/916638
Laravel9以降では、fake()メソッドを使う。
| 特徴 | fake() | $this->faker |
|---|---|---|
| 導入バージョン | Laravel9以降 | Laravel8以前 |
| 使用範囲 | グローバル | Factoryクラス内部 |
| 簡潔さ | シンプル | $thisが必要でやや冗長 |
| インスタンス指定 | 必要無し | $this->fakerを参照 |
Factoryを書いた後に、にて呼び出す。
public function run(): void
{
  $this->call([
    CustomerSeeder::class
  ]);
}のrunメソッドに以下を追記する。
Customer::factory(1000)->create();状況にあわせて以下のコマンドを入力する。
特定ファイルだけシーディングしたい場合
php artisan db:seed --class=UserSeeder全テーブル削除してmigrateして、その後特定ファイルのシーディングする場合
php artisan migrate:fresh --seed --seeder=UserSeeder全テーブル削除してmigrateして、その後シーディングする場合
php artisan migrate:fresh —seedを作成した上で、に以下のように記述することで、ダミーデータを作成できる。
UserFactoryのdefinition()に記述されたデフォルトデータを基に、create()メソッドでユーザーを作成。nameやemailの値を引数として渡すことで、ファクトリーのデフォルト設定をカスタマイズ。
User::factory()->create([
	'name' => 'Test User',
	'email' => 'test@test.com',
]);DB::table('users')->insert() を使用して直接データベースにレコードを挿入する方法。
を作成し、runメソッド内に以下を記述するか、のrunメソッドに以下を直接記述する。
複数insertしたい場合は、配列の配列([]内に更に[])を渡す。
DB::table('users')->insert([
    'name' => Str::random(10), // ランダムな10文字の名前
    'email' => Str::random(10).'@example.com', // ランダムなメールアドレス
    'password' => Hash::make('password'), // ハッシュ化されたパスワード
]);| 項目 | Factoryを使う方法 | Factoryを使わない方法(直接挿入) |
|---|---|---|
| データ生成の自動化 | Factory で定義したルールに基づいて生成 | すべてを手動で指定する必要がある |
| カスタマイズの柔軟性 | create() の引数で一部の値を上書き可能 | 挿入するすべての値を自分で記述する |
| 読みやすさ | 簡潔で読みやすい | フィールドごとに手動記述が必要でやや冗長 |
| テストデータ向き | 主にテストやシーディング用に設計されている | 小規模で一時的な挿入に適している |
- 少数のレコードを手動で挿入する場合
DB::table('users')->insert()がシンプルで素早く挿入できる。 - テストや開発で大量のランダムデータが必要な場合
Factoryを使うのがおすすめ。
ルーティング設定
モデルやダミーデータを作ったら、それをビューに渡すためにルーティングを設定する。アクセスがあると、ルーティングでリクエストが解決されて、コントローラーからビューにデータが渡される。
Restful
に以下を追記する。
RESTfulなルーティングを実現するためにRoute::resourceメソッドを使用する。
また、middlewareで設定するauthはログイン認証を、verifiedはメールアドレス認証を意味する。
メールアドレス認証の仕組みでは、ユーザー登録時に登録メールアドレス宛てに確認メールを送信し、リンクをクリックすることで認証が完了する。この認証状況は、usersテーブルのemail_verified_atカラムで管理される。
ただし、初期設定では実装されていない。
Route::resource('customers', CustomerController::class)->middleware(['auth', 'verified']);以下のコマンドでルーティングの確認を行う。
php artisan route:list一覧表示
CustomerController.phpのindex()メソッド
一覧表示などの基本的なアクションは、indexメソッドで処理するのがLaravelのRESTful設計の標準。
Eloquent ORMを使用することで、データベース操作を簡潔なコードで行うことができる。例えば、Customerモデルを使ってデータを取得する場合、Customer::select('id', 'name')->get()やCustomer::paginate(10)を使って、データベースから必要な情報を取得し、それをビューに渡す。
public function index()
{
  $customers = Customer::select(
        'id',
        DB::raw("CONCAT(last_name, ' ', first_name) AS full_name"),
        DB::raw("CONCAT(last_name_kana, ' ', first_name_kana) AS full_name_kana"),
        'created_at'
    )->get();

  return Inertia::render('Customers/Index', [
    'customers' => $customers
  ]);

  /* Inertiaを使わないなら */
  return view('customers.index', compact('customers'));
  /* Inertiaを使わないなら */
}
Customers/Index.vue
コントローラーのindex()メソッドから渡された値を受け取り、で表示する。
一度、console.logで出力してみる。
<script setup lang="ts">
  import { onMounted } from 'vue';

  const props = defineProps<{
    customers: {id: number, name: string }[]
  }>()
  onMounted(() => {
    console.log(props.customers);
  })
</script>

<template>

</template>
VuetifyのDataTableを使うと簡単にソートやページネーション機能もつけれるが、学習にならないので今回はVuetifyのTableコンポーネントを使って行う。ちなみに、DataTableを使ったコードとレイアウト例は以下。
<script setup lang="ts">
  import AuthenticatedLayout from '@/Layouts/AuthenticatedLayout.vue';
  import { Head } from '@inertiajs/vue3';
  import { DataTableHeader } from '@/types/vuetify'; //型ファイル呼び出し

  const props = defineProps<{
    customers: {id: number, full_name: string, full_name_kana: string, created_at:string}[]
  }>()

  const headers:DataTableHeader[] = [
    { title: 'ID', key: 'id' },
    { title: '名前', key: 'full_name' },
    { title: 'かな', key: 'full_name_kana' },
    { title: '最終来院日', key: 'created_at' },
  ];
</script>

<template>
	<Head title="Dashboard" />

	<AuthenticatedLayout>
		<template #header>
			<h2
				class="text-xl font-semibold leading-tight text-gray-800 dark:text-gray-200"
			>
				顧客関連
			</h2>
		</template>

		<div>
			<div class="mx-auto max-w-7xl sm:px-6 lg:px-8">
				<div
					class="overflow-hidden bg-white shadow-sm sm:rounded-lg dark:bg-gray-800"
				>
          <v-container>
            <v-row>
              <v-col cols="12">
                <v-data-table
                  :items="customers"
                  :headers="headers"
                  item-key="id"
                >
                </v-data-table>
              </v-col>
            </v-row>
          </v-container>
				</div>
			</div>
		</div>
	</AuthenticatedLayout>
</template>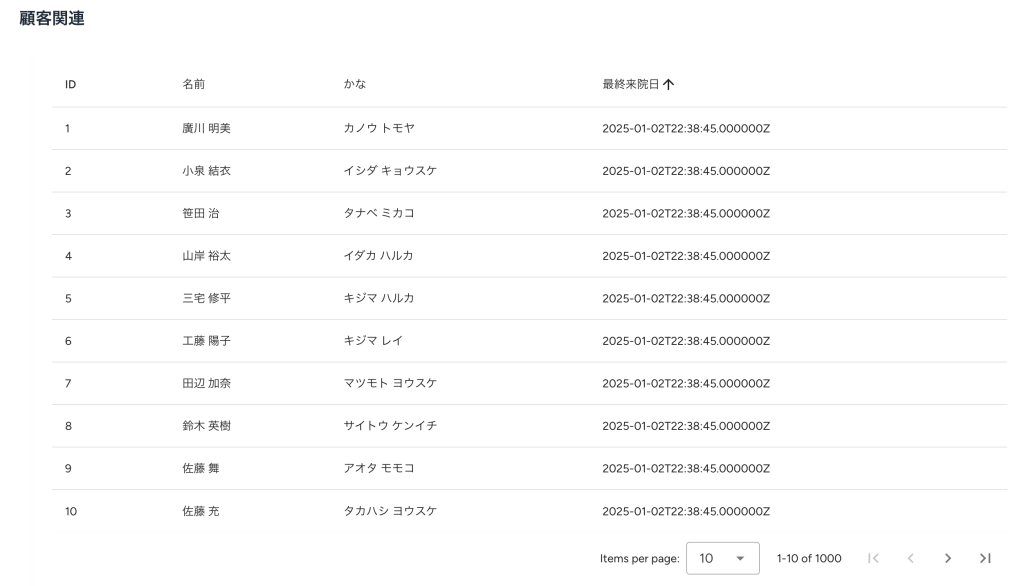
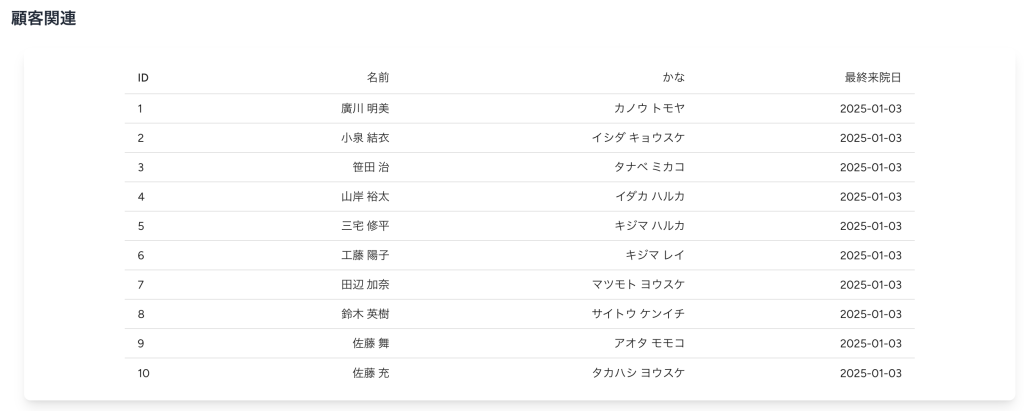
一覧表示する
Controllerのget()をpaginate()メソッドに変更する。括弧内は1ページに表示する件数。
  public function index()
  {
    $customers = Customer::select(
        'id',
        DB::raw("CONCAT(last_name, ' ', first_name) AS full_name"),
        DB::raw("CONCAT(last_name_kana, ' ', first_name_kana) AS full_name_kana"),
        'created_at'
    )->paginate(10);

    return Inertia::render('Customers/Index', [
      'customers' => $customers,
    ]);
  }
ページネーション作成
Inertia.jsを使用したページネーションを実装する。
ディレクトリにを作成し、以下を入力する。
<script setup lang="ts">
import { Link } from '@inertiajs/vue3';

const props = defineProps<{
  links: {
    url: string | null;
    label: string;
    active: boolean;
  }[];
}>()

</script>
<template>
  <div v-if="links.length > 3">
      <div class="flex flex-wrap -mb-1">
        <template v-for="(link, p) in links" :key="p">
          <div v-if="link.url === null"
            class="mr-1 mb-1 px-4 py-3 text-sm leading-4 text-gray-400 border rounded"
            v-html="link.label"
          />
          <Link v-else
            class="mr-1 mb-1 px-4 py-3 text-sm leading-4 border rounded hover:bg-blue-300 focus:border-indigo-500"
            :class="{ 'bg-blue-700 text-white': link.active }"
            :href="link.url"
            v-html="link.label"
          />
        </template>
      </div>
  </div>
</template>を以下のように編集。
<script setup lang="ts">
  import { onMounted } from 'vue';
  import AuthenticatedLayout from '@/Layouts/AuthenticatedLayout.vue';
  import { Head } from '@inertiajs/vue3';
  import dayjs from 'dayjs';
  import { LaravelPagination } from '@/types/laravel';
  import Pagination from '@/Components/Pagination.vue'; //Paginationをimport

  type Customer = {
    id: number;
    full_name: string;
    full_name_kana: string;
    created_at: string;
  };

  const props = defineProps<{
    customers: LaravelPagination<Customer>;
  }>();
</script>

<template>
	<Head title="Dashboard" />

	<AuthenticatedLayout>
		<template #header>
			<h2
				class="text-xl font-semibold leading-tight text-gray-800 dark:text-gray-200"
			>
				顧客関連
			</h2>
		</template>

		<div class="">
			<div class="mx-auto max-w-7xl sm:px-6 lg:px-8">
				<div
					class="overflow-hidden bg-white shadow-lg sm:rounded-lg dark:bg-gray-800"
				>
          <v-container>
            <v-row class="justify-center">
              <v-col cols="10">
                <v-table density="compact">
                  <thead>
                    <tr>
                      <th class="text-left">ID</th>
                      <th class="text-right">名前</th>
                      <th class="text-right">かな</th>
                      <th class="text-right">最終来院日</th>
                    </tr>
                  </thead>
                  <tbody>
                    <tr
                      v-for="item in customers.data" :key="item.id">
                      <td>{{ item.id }}</td>
                      <td class="text-right">{{ item.full_name }}</td>
                      <td class="text-right">{{ item.full_name_kana }}</td>
                      <td class="text-right">{{ dayjs(item.created_at).format("YYYY-MM-DD") }}</td>
                    </tr>
                  </tbody>
                </v-table>
              </v-col>
              <Pagination class="my-6" :links="customers.links" /> <!-- Paginationを追記 -->
            </v-row>
          </v-container>
				</div>
			</div>
		</div>
	</AuthenticatedLayout>
</template>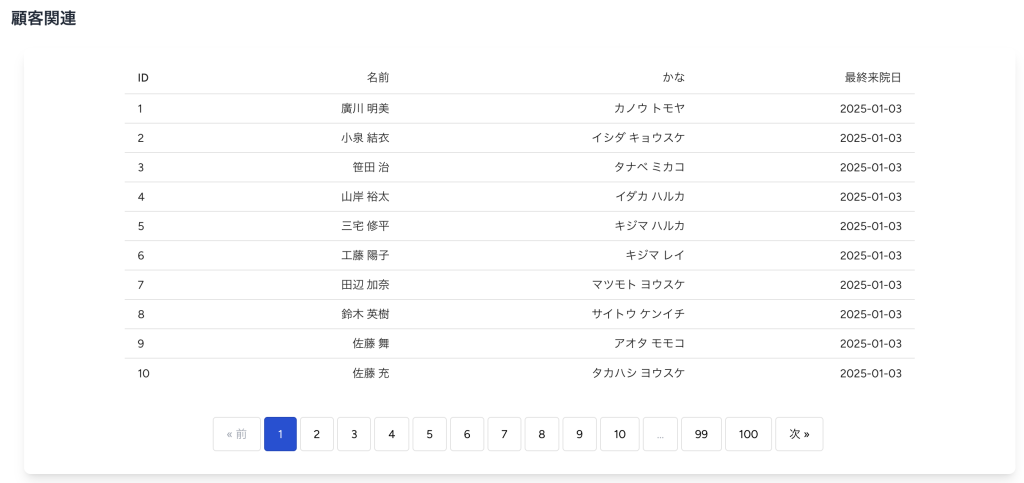
ページネーションをもう少しカスタマイズしたい方は以下の記事が参考になる。
顧客検索機能
名前とカナで顧客検索ができる機能の実装を行う。
Customerモデルにローカルスコープを記述する。
以下はscopeSearchByNameというローカルスコープを記述し、これをコントローラーで呼び出す。
<?php

namespace App\Models;

use Illuminate\Database\Eloquent\Factories\HasFactory;
use Illuminate\Database\Eloquent\Model;

class Customer extends Model
{
    /** @use HasFactory<\Database\Factories\CustomerFactory> */
    use HasFactory;

    protected $fillable = ['last_name', 'first_name', 'last_name_kana', 'first_name_kana', 'postcode', 'address', 'tel', 'birth', 'gender', 'memo', 'delete_flg'];

    public function scopeSearchByName($query, $keyword)
    {
        if ($keyword) {
            return $query->where(function ($query) use ($keyword) {
                $query->where('last_name', 'LIKE', '%' . $keyword . '%')
                    ->orWhere('first_name', 'LIKE', '%' . $keyword . '%')
                    ->orWhere('last_name_kana', 'LIKE', '%' . $keyword . '%')
                    ->orWhere('first_name_kana', 'LIKE', '%' . $keyword . '%');
            });
        }

        return $query;
    }
}
ローカルスコープを使用することで、特定の条件を簡単にクエリに適用することができ、コードの可読性や再利用性が向上する。
スコープメソッド名はscopeで始め、その後にキャメルケースで続ける。
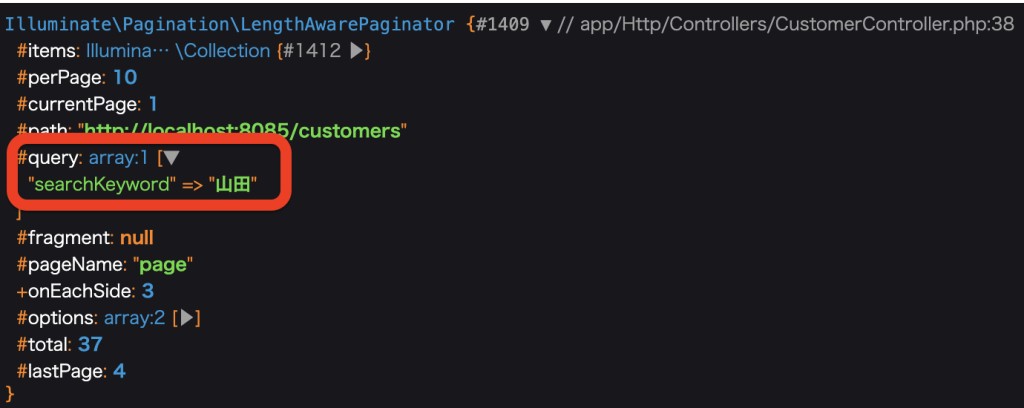
を以下の様に、scopeという文字を除いたメソッド名でローカルスコープを記述し、引数を指定する。例えば以下のコードでは、山田というワードで検索をかけ、dd()でデバッグしている。実際に山田の検索結果が得られれば成功。
class CustomerController extends Controller
{
  public function index(Request $request)
  {
    $customers = Customer::searchByName('山田')
    ->select(
        'id',
        DB::raw("CONCAT(last_name, ' ', first_name) AS full_name"),
        DB::raw("CONCAT(last_name_kana, ' ', first_name_kana) AS full_name_kana"),
        'created_at')
    ->paginate(10);

    dd($customers)

    return Inertia::render('Customers/Index', [
      'customers' => $customers,
    ]);
  }
}
実際には入力された値が渡るようにしたいので、以下のように修正する。
class CustomerController extends Controller
{
  public function index(Request $request)
  {
    $keyword = $request->searchKeyword ?? '';     //=====ここを追記======
    $customers = Customer::searchByName($keyword) //=====引数を$keywordに======
    ->select(
        'id',
        DB::raw("CONCAT(last_name, ' ', first_name) AS full_name"),
        DB::raw("CONCAT(last_name_kana, ' ', first_name_kana) AS full_name_kana"),
        'created_at')
    ->paginate(10);

    //dd($customers)

    return Inertia::render('Customers/Index', [
      'customers' => $customers,
    ]);
  }
}次にView側、に以下を記述する。
Enterキーでも検索を実行させたいので、InertiaのuseFormを用いることにした。
検索用のTextFieldにはVuetifyを用いる。buttonかEnterキーを押下すると、searchByName()が走り、getメソッドにてフォーム送信される。パラメータはsearchKeywordとして送られる(コントローラー側で$request->searchKeywordで取得する)。
<script setup lang="ts">
  import { useForm } from '@inertiajs/vue3';

  // 型定義
  type SearchForm = {
    searchKeyword?: string;
  };

  // searchKeywordをリアクティブにする
  const searchForm = useForm<SearchForm>({
    searchKeyword: ""
  })

  // 動的にクエリパラメータを生成
  const queryParams = computed(() => {
    const params:Record<string, string> = {}
    if (searchForm.searchKeyword) {
      params.searchKeyword = searchForm.searchKeyword;
    }
    return params;
  });

  const searchByName = () => {
    searchForm.get(route('customers.index', queryParams.value))
  }
</script>
<template>
  <form @submit.prevent class="w-100">
    <v-text-field density="compact" label="顧客検索" variant="solo" hide-details single-line v-model="searchForm.searchKeyword">
      <template #append-inner>
        <button @click="searchByName" type="submit" class="icon-button">
          <v-icon>mdi-magnify</v-icon>
        </button>
      </template>
    </v-text-field>
  </form>
</template>次に、ページネーションでページ移動すると検索結果が消えてしまうのでその修正と、検索結果画面において、検索ワードも消えないように保持を行う。
を以下の様に編集する。
class CustomerController extends Controller
{
  public function index(Request $request)
  {
    $keyword = $request->searchKeyword ?? '';
    $customers = Customer::searchByName($keyword)
    ->select(
        'id',
        DB::raw("CONCAT(last_name, ' ', first_name) AS full_name"),
        DB::raw("CONCAT(last_name_kana, ' ', first_name_kana) AS full_name_kana"),
        'created_at')
    ->paginate(10);
    ->withQueryString();           //=====ここを追記======

    //dd($customers)

    return Inertia::render('Customers/Index', [
      'customers' => $customers,
      'keyword' => $keyword       //=====ここを追記======
    ]);
  }
}withQueryString()をつけることによって、ページネーションでページ移動した際もクエリが保持される。
$keywordをView側に渡したので、に以下を追記する。これで検索ワードを保持してくれる。
<script setup lang="ts">
import { onMounted } from 'vue';

const props = defineProps<{
  customers: LaravelPagination<Customer>;
  keyword: string;                           //=====ここを追記======
}>();

onMounted(() => {
  searchForm.searchKeyword = props.keyword   //=====ここを追記======
})
</script>
ソート機能
次に、最終来院日でのソート機能を実装する。のindex()に以下を追記する。
クエリパラメータでsortValが送られてきて、それを取得する。ascかdescかに応じてorderBy()でソートをかける。
最終的に$sortを返却する。
  public function index(Request $request)
  {
    $keyword = $request->searchKeyword ?? '';
    $sort = $request->sortVal ?? '';                  //=====ここを追記======

    $customers = Customer::searchByName($keyword)
    ->select(
        'id',
        DB::raw("CONCAT(last_name, ' ', first_name) AS full_name"),
        DB::raw("CONCAT(last_name_kana, ' ', first_name_kana) AS full_name_kana"),
        'created_at')
    ->when($sort === 'asc', function ($query) {                         //=====ここを追記======
        $query->orderBy('created_at', 'asc')->orderBy('id', 'asc');       //=====ここを追記======
    }, function ($query) {                                                //=====ここを追記======
        $query->orderBy('created_at', 'desc')->orderBy('id', 'desc');     //=====ここを追記======
    })                                                                    //=====ここを追記======
    ->paginate(10)
    ->withQueryString();

    return Inertia::render('Customers/Index', [
      'customers' => $customers,
      'keyword' => $keyword,
      'sort' => $sort                                 //=====ここを追記======
    ]);
}View側での処理を行う。に以下を追記する。queryParams()は既存のものを使い、追記する。
queryParams()では顧客検索のクエリパラメータも同時に送れるようにし、保持できるようにしている。
<script setup lang="ts">
  // 型定義
  type SortForm = {
    sortVal: 'asc' | 'desc';
  };

  // sortValをリアクティブにする
  const sort = useForm<SortForm>({
    sortVal: "desc"
  })

  // ソートアイコンの切り替え
  const getSortIcon = () => {
    return sort.sortVal === 'asc' ? "mdi-menu-up" : "mdi-menu-down";
  }

  // 動的にクエリパラメータを生成
  const queryParams = computed(() => {
    const params:Record<string, string> = {}
    if (searchForm.searchKeyword) {
      params.searchKeyword = searchForm.searchKeyword;
    }
    if (sort.sortVal) {                                // =======既存のqueryParamsに追記する=======
      params.sortVal = sort.sortVal;                   // =======既存のqueryParamsに追記する=======
    }                                                  // =======既存のqueryParamsに追記する=======
    return params;
  });

  // ソート押下時処理
  const sortHandler = () => {
    sort.sortVal = sort.sortVal === "asc" ? "desc" : "asc";

    sort.get(route('customers.index', queryParams.value))
  }
</script>
<template>
<!-- 省略 -->
  <thead>
    <tr>
      <th class="text-left">ID</th>
      <th class="text-right">名前</th>
      <th class="text-right">かな</th>
      <th class="text-right">
        <button @click="sortHandler">                  <!-- =======buttonを追加======= -->
          最終来院日
          <v-icon>{{ getSortIcon() }}</v-icon>         <!-- =======buttonを追加======= -->
        </button>                                      <!-- =======buttonを追加======= -->
      </th>
    </tr>
  </thead>
<!-- 省略 -->
</template>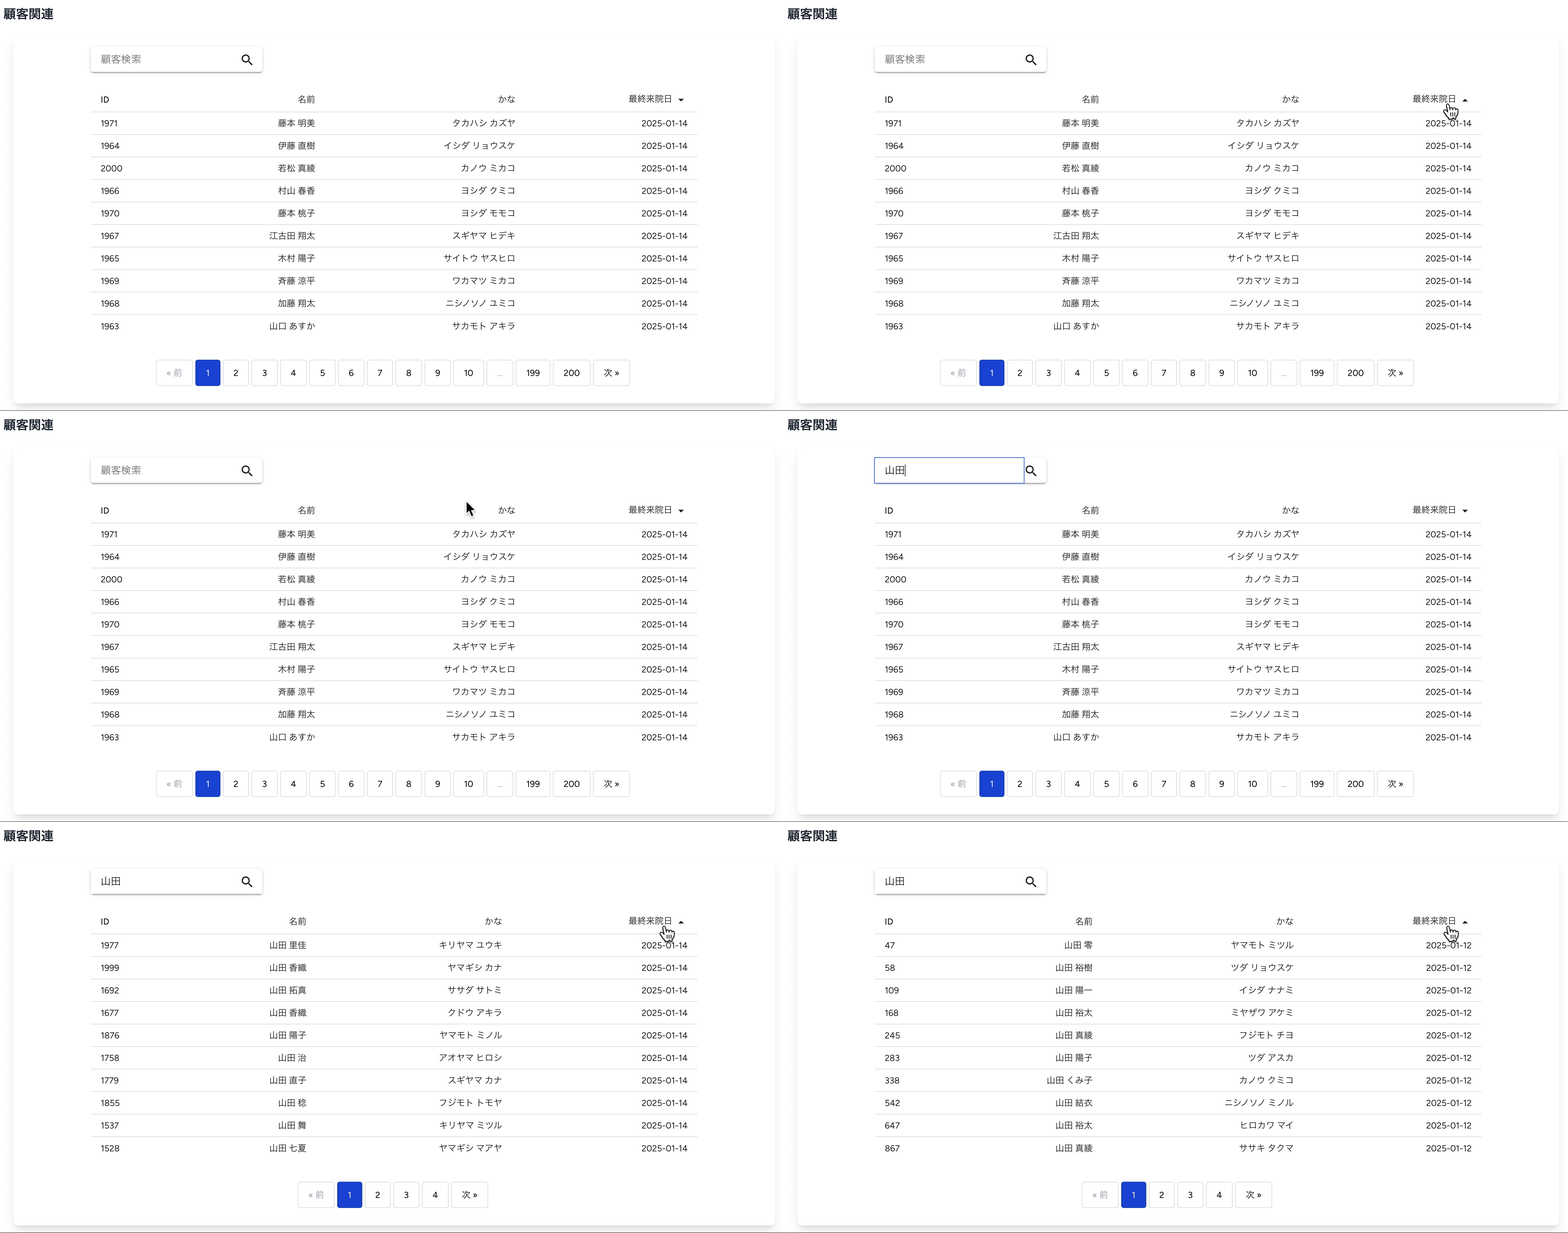
完成系のコードは以下。
<script setup lang="ts">
  import { onMounted, computed } from 'vue';
  import AuthenticatedLayout from '@/Layouts/AuthenticatedLayout.vue';
  import { Head, useForm, Link } from '@inertiajs/vue3';
  import dayjs from 'dayjs';
  import { LaravelPagination } from '@/types/laravel';
  import Pagination from '@/Components/Pagination.vue';

  // customers のデータ構造を定義
  type Customer = {
    id: number;
    full_name: string;
    full_name_kana: string;
    created_at: string;
  };
  // フォームの型を定義
  type SearchForm = {
    searchKeyword?: string;
  };
  type SortForm = {
    sortVal: 'asc' | 'desc';
  };

  // props管理
  // LaravelPagination<Customer> を使用
  const props = defineProps<{
    customers: LaravelPagination<Customer>;
    keyword: string;
    sort: 'asc' | 'desc';
  }>();

  // フォームデータ管理
  const searchForm = useForm<SearchForm>({
    searchKeyword: ""
  })
  const sort = useForm<SortForm>({
    sortVal: "desc"
  })

  // ソートアイコンの切り替え
  const getSortIcon = () => {
    return sort.sortVal === 'asc' ? "mdi-menu-up" : "mdi-menu-down";
  }

  // 動的にクエリパラメータを生成
const queryParams = computed(() => {
  const params:Record<string, string> = {}
  if (searchForm.searchKeyword) {
    params.searchKeyword = searchForm.searchKeyword;
  }
  if (sort.sortVal) {
    params.sortVal = sort.sortVal;
  }
  return params;
});

  // GET送信用関数
  const searchByName = () => {
    searchForm.get(route('customers.index', queryParams.value))
  }
  const sortHandler = () => {
    sort.sortVal = sort.sortVal === "asc" ? "desc" : "asc";

    sort.get(route('customers.index', queryParams.value))
  }

  // 画面マウント後処理
  onMounted(() => {
    //検索ワードを保持する
    searchForm.searchKeyword = props.keyword
    sort.sortVal = props.sort
  })
</script>

<template>
	<Head title="Dashboard" />

	<AuthenticatedLayout>
		<template #header>
			<h2
				class="text-xl font-semibold leading-tight text-gray-800 dark:text-gray-200"
			>
				顧客関連
			</h2>
		</template>

		<div class="">
			<div class="mx-auto max-w-7xl sm:px-6 lg:px-8">
				<div
					class="overflow-hidden bg-white shadow-lg sm:rounded-lg dark:bg-gray-800"
				>
          <v-container>
            <v-row>
              <v-col cols="1"></v-col>
              <v-col cols="3" class="d-flex">
                <form @submit.prevent class="w-100">
                  <v-text-field density="compact" label="顧客検索" variant="solo" hide-details single-line v-model="searchForm.searchKeyword">
                    <template #append-inner>
                      <button @click="searchByName" type="submit" class="icon-button">
                        <v-icon>mdi-magnify</v-icon>
                      </button>
                    </template>
                  </v-text-field>
                </form>
              </v-col>
            </v-row>
            <v-row class="justify-center">
              <v-col cols="12" md="10" lg="10" xl="10">
                <v-table density="compact">
                  <thead>
                    <tr>
                      <th class="text-left">ID</th>
                      <th class="text-right">名前</th>
                      <th class="text-right">かな</th>
                      <th class="text-right">
                        <button @click="sortHandler">
                          最終来院日
                          <v-icon>{{ getSortIcon() }}</v-icon>
                        </button>
                      </th>
                    </tr>
                  </thead>
                  <tbody>
                    <tr
                      v-for="item in customers.data" :key="item.id">
                      <td>{{ item.id }}</td>
                      <td class="text-right">{{ item.full_name }}</td>
                      <td class="text-right">{{ item.full_name_kana }}</td>
                      <td class="text-right">{{ dayjs(item.created_at).format("YYYY-MM-DD") }}</td>
                    </tr>
                  </tbody>
                </v-table>
              </v-col>
              <Pagination class="my-6" :links="customers.links" />
            </v-row>
          </v-container>
				</div>
			</div>
		</div>
	</AuthenticatedLayout>
</template>
続きは②で。
 開発メモ② 登録・詳細機能実装(Laravel11 + Vue.js3 + TypeScript + Inertia.js + Vuetify)
