②では登録・詳細機能の実装を行う。①は以下からどうぞ。
 開発メモ① モデル作成〜一覧表示〜検索・ソート機能(Laravel11 + Vue.js3 + TypeScript + Inertia.js + Vuetify)
投稿機能
Viewを作成
View側から作成する。
を作成し、投稿画面を以下の様に作成。
<script setup lang="ts">
  import AuthenticatedLayout from '@/Layouts/AuthenticatedLayout.vue';
  import { Head, useForm } from '@inertiajs/vue3';
  import TextInput from '@/Components/TextInput.vue';
  import TextArea from '@/Components/TextArea.vue';
  import InputError from '@/Components/InputError.vue';
  import { Core as YubinBangoCore } from "yubinbango-core2";

  // customers のデータ構造を定義
  type Customer = {
    last_name: string;
    first_name: string;
    last_name_kana: string;
    first_name_kana: string;
    postcode: string;
    address: string;
    tel: string;
    birth: string;
    gender: number;
    memo: string;
  };

  const customerForm = useForm<Customer>({
    last_name: "",
    first_name: "",
    last_name_kana: "",
    first_name_kana: "",
    postcode: "",
    address: "",
    tel: "",
    birth: "",
    gender: 0,
    memo: "",
  })

  const fetchAddress = () => {
    new YubinBangoCore(String(customerForm.postcode), (value: any) => {
      customerForm.address = value.region + value.locality + value.street
    })
  }

  const storeCustomer = () => {
    customerForm.post(route('customers.store'))
  }

</script>
<template>
	<Head title="顧客登録" />

	<AuthenticatedLayout>
		<template #header>
			<h2
				class="text-xl font-semibold leading-tight text-gray-800 dark:text-gray-200"
			>
				顧客登録
			</h2>
		</template>

		<div class="mb-10">
			<div class="mx-auto max-w-7xl sm:px-6 lg:px-8">
				<div
					class="py-5 overflow-hidden bg-white shadow-lg sm:rounded-lg dark:bg-gray-800"
				>
          <v-container>
            <v-row>
              <v-col lg="3"></v-col>
              <v-col md="12" lg="6" cols="12">
                <form @submit.prevent="storeCustomer">
                  <InputError :message="customerForm.errors.last_name" />
                  <InputError :message="customerForm.errors.first_name" />
                  <div class="d-flex">
                    <TextInput
                    label="姓"
                    placeholder="例:山田"
                    id="last_name"
                    v-model="customerForm.last_name"
                    type="text"
                    icon="mdi-card-bulleted-outline"
                    class="block w-full"
                    required
                    autofocus
                    />
                    <TextInput
                    label="名"
                    placeholder="例:太郎"
                    id="first_name"
                    v-model="customerForm.first_name"
                    type="text"
                    icon="mdi-card-bulleted-outline"
                    class="block w-full ml-2"
                    required
                    />
                  </div>
                  <InputError :message="customerForm.errors.last_name_kana" />
                  <InputError :message="customerForm.errors.first_name_kana" />
                  <div class="d-flex">
                    <TextInput
                    label="姓カナ"
                    placeholder="例:ヤマダ"
                    id="last_name_kana"
                    v-model="customerForm.last_name_kana"
                    type="text"
                    icon="mdi-card-bulleted-outline"
                    class="block w-full"
                    required
                    />
                    <TextInput
                    label="名カナ"
                    placeholder="例:タロウ"
                    id="first_name_kana"
                    v-model="customerForm.first_name_kana"
                    type="text"
                    icon="mdi-card-bulleted-outline"
                    class="block w-full ml-2"
                    required
                    />
                  </div>
                  <InputError :message="customerForm.errors.postcode" />
                  <TextInput
                  label="郵便番号"
                  placeholder="例:1234567"
                  id="postcode"
                  v-model="customerForm.postcode"
                  type="number"
                  icon="mdi-post-lamp"
                  class="block w-full"
                  required
                  @change="fetchAddress"
                  />
                  <InputError :message="customerForm.errors.address" />
                  <TextInput
                  label="住所"
                  id="address"
                  v-model="customerForm.address"
                  type="text"
                  icon="mdi-home"
                  class="block w-full"
                  required
                  />
                  <InputError :message="customerForm.errors.tel" />
                  <TextInput
                  label="電話番号"
                  placeholder="例:09876543210"
                  id="tel"
                  v-model="customerForm.tel"
                  type="number"
                  icon="mdi-phone"
                  class="block w-full"
                  required
                  />
                  <InputError :message="customerForm.errors.birth" />
                  <TextInput
                  label="誕生日"
                  id="birth"
                  v-model="customerForm.birth"
                  type="date"
                  icon="mdi-cake"
                  class="block w-full"
                  required
                  />
                  <InputError :message="customerForm.errors.gender" />
                  <v-radio-group v-model="customerForm.gender" inline>
                    <template v-slot:label>
                        <div>性別</div>
                    </template>
                    <v-radio label="男性" :value="0"></v-radio>
                    <v-radio label="女性" :value="1" class="ml-2"></v-radio>
                    <v-radio label="不明" :value="2" class="ml-2"></v-radio>
                  </v-radio-group>
                  <InputError :message="customerForm.errors.memo" />
                  <TextArea
                  label="メモ"
                  id="memo"
                  v-model="customerForm.memo"
                  icon="mdi-book-open-blank-variant-outline"
                  class="block w-full"
                  />
                  <v-btn :disabled="customerForm.processing" color="blue-darken-1" type="submit" class="text-none" rounded="xs" size="x-large" variant="flat" block>登録する</v-btn>
                </form>
              </v-col>
            </v-row>
          </v-container>
        </div>
      </div>
    </div>
  </AuthenticatedLayout>
</template>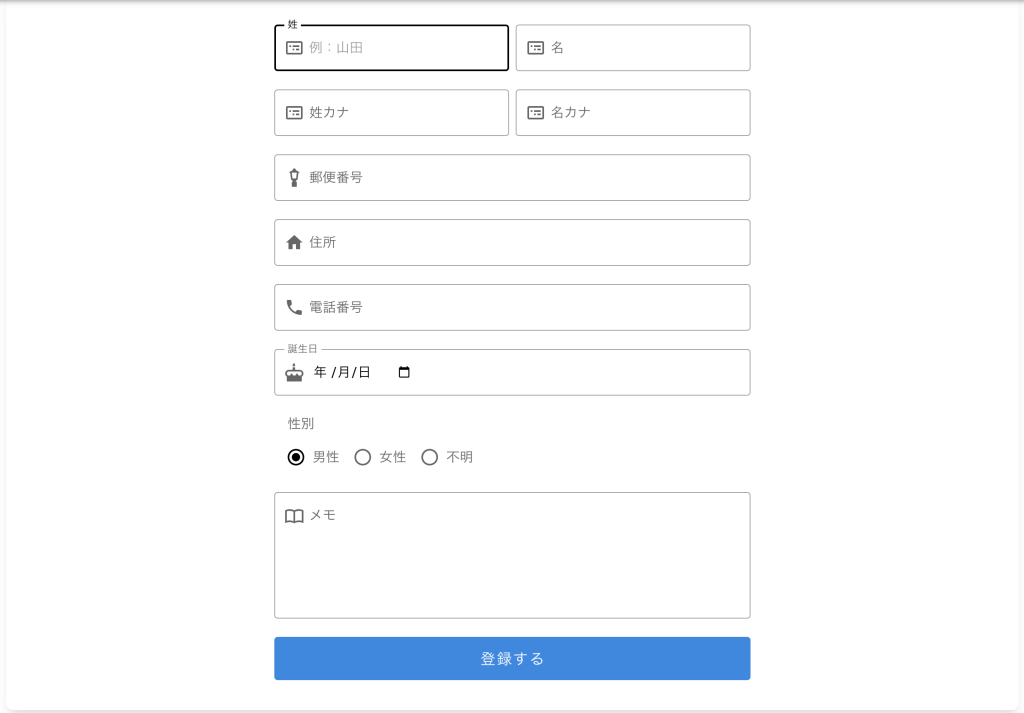
開発メモ①に引き続き、vuetifyにてUIは構築し、formはInertiaのuseFormを用いる。
form.errors.****とすることで、バリデーションエラーをpropsから取得できる。
郵便番号入力はyubinbango-core2というライブラリを用いた。
、はデフォルトをものをvuetifyに書き換えて使用。は新規に作成。
v-radioはコンポーネント化検討中。これらのコンポーネントは以下のgithubを参照。


Routing確認
CustomersモデルはRestful設計に基づいて作成しているので新たにルーティング設定は必要ない。
確認する場合は、php artisan route:listにて一覧表示する。
php artisan route:list

~略~
POST customers …………………customers.store › CustomerController@store
~略~この表示となるので、投稿ボタン押下時にはcustomers.storeが走るようにし、のstore()メソッドに処理を記述する。
編集
以下の様にstore()メソッドに追記する。
最初にdd()を用いてから投稿をテストすると送られてくるデータを見れる。
確認できたらdd()メソッドは消しておく。
<?php

namespace App\Http\Controllers;

use App\Http\Requests\StoreCustomerRequest;
use App\Http\Requests\UpdateCustomerRequest;
use App\Models\Customer;
use Inertia\Inertia;
use Illuminate\Support\Facades\DB;
use Illuminate\Http\Request;

class CustomerController extends Controller
{
  /**
   * Store a newly created resource in storage.
   */
  public function store(StoreCustomerRequest $request)
  {
    dd($request->all()); //確認後、コメントアウトする

    Customer::create([
      'last_name' => $request->last_name,
      'first_name' => $request->first_name,
      'last_name_kana' => $request->last_name_kana,
      'first_name_kana' => $request->first_name_kana,
      'postcode' => $request->postcode,
      'address' => $request->address,
      'tel' => $request->tel,
      'birth' => $request->birth,
      'gender' => $request->gender,
      'memo' => $request->memo,
    ]);

    return to_route('customers.index')->with([
      'message' => '登録が完了しました!',
      'status' => 'success',
    ]);
  }
}create()メソッドを用いる場合は、モデルで$fillableを設定する(開発メモ①参照・または$guraded)。
$fillableに記述されている属性だけが、create()やupdate()で代入・保存される。
| メソッド | 説明 | 使い方 | 特徴 |
|---|---|---|---|
| create() | 新しいレコードを一度に挿入する。配列を使って一括代入。 | $customer = Customer::create([ ‘name’ => ‘John Doe’, ‘email’ => ‘john@example.com’ ]); | 一度の呼び出しで新規レコードを挿入。 $fillable が必要。 |
| save() | モデルインスタンスを保存(新規挿入または既存のレコードを更新)。 | $customer = new Customer(); $customer->name = ‘John Doe’; $customer->save(); | 既存のインスタンスに対して挿入または更新。 |
| update() | 既存のレコードを更新。配列で一括更新。 | $customer = Customer::find(1); $customer->update([ ‘phone’ => ‘987-654-3210’ ]); | 一括更新専用。既存レコードの更新のみ。 |
| firstOrCreate() | 条件に一致するレコードがあれば返し、一致しなければ新規作成。 | $customer = Customer::firstOrCreate([ ‘email’ => ‘john@example.com’ ], [‘name’ => ‘John Doe’]); | 条件が一致すれば既存レコードを、なければ新規作成。 |
| updateOrCreate() | 条件に一致するレコードがあれば更新し、一致しなければ新規作成。 | $customer = Customer::updateOrCreate([ ‘email’ => ‘john@example.com’ ], [‘phone’ => ‘987-654-3210’]); | 条件一致で更新、なければ新規作成。 |
| find() | 主キー(通常はID)を指定してレコードを取得。 | $customer = Customer::find(1); | 主キーでレコードを検索、見つからなければnullを返す。 |
| findOrFail() | 主キーでレコードを取得。見つからない場合は例外をスロー。 | $customer = Customer::findOrFail(1); | 見つからなければ例外が発生。 |
| get() | 条件に一致する複数のレコードを取得。 | $customers = Customer::where(‘status’, ‘active’)->get(); | 複数レコードを取得、コレクションを返す。 |
投稿後は顧客一覧ページに戻る。Inertia::renderはページ描画用なので基本的にredirect()か、to_route()を用いる(to_route()はLaravel9以降)。
更に、with()を用いてフラッシュメッセージを渡している(フラッシュメッセージはに追記が必要なので後述)。
編集
に達する前にformRequestクラスでバリデーションを行う。
以下の記事がとてもわかりやすいので参考に。
authorizeはデフォルトでfalseになっているので、trueに変更し、rulesに記述するバリデーションチェックをできるようにする。
<?php

namespace App\Http\Requests;

use Illuminate\Foundation\Http\FormRequest;

class StoreCustomerRequest extends FormRequest
{
    /**
     * Determine if the user is authorized to make this request.
     */
    public function authorize(): bool
    {
        return true;
    }

    /**
     * Get the validation rules that apply to the request.
     *
     * @return array<string, \Illuminate\Contracts\Validation\ValidationRule|array<mixed>|string>
     */
    public function rules(): array
    {
        return [
            'last_name' => ['required', 'max:50'],
            'first_name' => ['required', 'max:50'],
            'last_name_kana' => ['required', 'regex:/^[ァ-ヾ]+$/u', 'max:50'],
            'first_name_kana' => ['required', 'regex:/^[ァ-ヾ]+$/u', 'max:50'],
            'postcode' => ['required', 'max:7'],
            'address' => ['required', 'max:100'],
            'tel' => ['required', 'max:20'],
            'birth' => ['required', 'date'],
            'gender' => ['required'],
            'memo' => ['max:1000'],
        ];
    }
}
言語ファイル編集
は、バリデーションエラー時に生成されるエラーメッセージの中で、フィールド名を分かりやすく表示するために使う。
のattributes配列に、必要な入力項目名を日本語で追記する。
たとえば、新しいフォームでcompanyという項目がある場合、‘company’ => ‘会社名’と記述する。
	'attributes' => [
		'password' => 'パスワード',
		'name' => '名',
		'title' => '件名',
		'gender' => '性別',
		'age' => '年齢',
		'contact' => 'お問い合わせ内容',
		'caution' => '注意事項',
		'content' => '本文',
		'memo' => 'メモ',
		'price' => '料金',
		'kana' => 'カナ',
		'tel' => '電話番号',
		'email' => 'メールアドレス',
		'postcode' => '郵便番号',
		'address' => '住所',
		'birth' => '誕生日',
		'gender' => '性別',
		'last_name' => '姓',
		'first_name' => '名前',
		'last_name_kana' => '姓カナ',
		'first_name_kana' => '名カナ',
],編集
は、Inertia.jsを使用するLaravelプロジェクトにおいて、リクエストとレスポンスの間でデータを操作するためのミドルウェアのこと。
このミドルウェアは、サーバーサイドのデータをフロントエンド側(Viewファイル)に渡す際の「共通データの管理」を行う。
Laravelでは、すべてのInertiaリクエストがこのミドルウェアを通過し、share() メソッドを使用して共有データを設定する。この共有データはInertiaのpropsとしてVueやReactなどで参照できるようになる。
フラッシュメッセージは、コントローラーでwith()を使用してセッションに保存される。with()はセッションに一時的なデータ(フラッシュデータ)を保存し、次のリクエスト時に自動的に破棄される仕組み。
public function store(StoreCustomerRequest $request)
{
    // データの保存処理
    // ...

    // フラッシュメッセージをセッションに保存
    return to_route('customers.index')->with([
      'message' => '登録が完了しました!',
      'status' => 'success',
    ]);
}ここでwith('message', 'メッセージ')を使うと、セッションにmessageというキーでメッセージが保存される。
セッションに保存されたデータ(フラッシュメッセージなど)をフロントエンドに渡すために、でshareメソッドを使用する。
以下では、セッションのmessageやstatusをflashというキーにまとめてInertiaのpropsに追加している。
namespace App\Http\Middleware;

use Illuminate\Http\Request;
use Inertia\Middleware;

class HandleInertiaRequests extends Middleware
{
	public function share(Request $request): array
	{
		return [
			...parent::share($request),
			'auth' => [
				'user' => $request->user(),
			],
			'flash' => [
				'message' => fn() => $request->session()->get('message'),
				'status' => fn() => $request->session()->get('status'),
			],
		];
	}
}
このコードでは、
session('message')を呼び出し、セッションに保存されたフラッシュデータを取得。propsにflashキーとして追加。- VueやReactなどのフロントエンドから、
props.flash.messageとしてアクセスできるようになる。
Inertia.jsはLaravelのセッションやBladeテンプレートを直接使わず、フロントエンドにすべてのデータをpropsとして渡す。そのため、セッションデータ(フラッシュメッセージ)もpropsに追加し、クライアント側で動的に表示する必要がある。
Vue.jsでのフラッシュメッセージの取得
フロントエンドでフラッシュメッセージを表示するには、Inertia.jsのusePage()を使用する。
にを作成する。
vuetifyのv-snackbarを用いる。v-ifでは動かなかったため、v-modelを用いて、statusがsuccessであれば表示するようにしている。
<script setup lang="ts">
  import { usePage } from '@inertiajs/vue3';
  import { ref } from 'vue';

  const flash = usePage().props.flash;

  // 初期状態でSnackbarを表示するかどうかを設定
  const isSnackbarVisible = ref(flash?.status === 'success');

</script>
<template>
  <v-snackbar v-model="isSnackbarVisible" color="success" location="top center" timeout="2500">
    {{ flash?.message }}
  </v-snackbar>
</template>flashプロパティの型が存在しないと怒られるので、に追記。
import { PageProps as InertiaPageProps } from '@inertiajs/core';
import { AxiosInstance } from 'axios';
import { route as ziggyRoute } from 'ziggy-js';
import { PageProps as AppPageProps } from './';

declare global {
	interface Window {
		axios: AxiosInstance;
	}

	/* eslint-disable no-var */
	var route: typeof ziggyRoute;
}

declare module 'vue' {
	interface ComponentCustomProperties {
		route: typeof ziggyRoute;
	}
}

declare module '@inertiajs/core' {
	interface PageProps extends InertiaPageProps, AppPageProps {
		flash?: {                                                    //=========ここを追記=========
			message?: string;                                          //=========ここを追記=========
			status?: string;                                           //=========ここを追記=========
		}
	}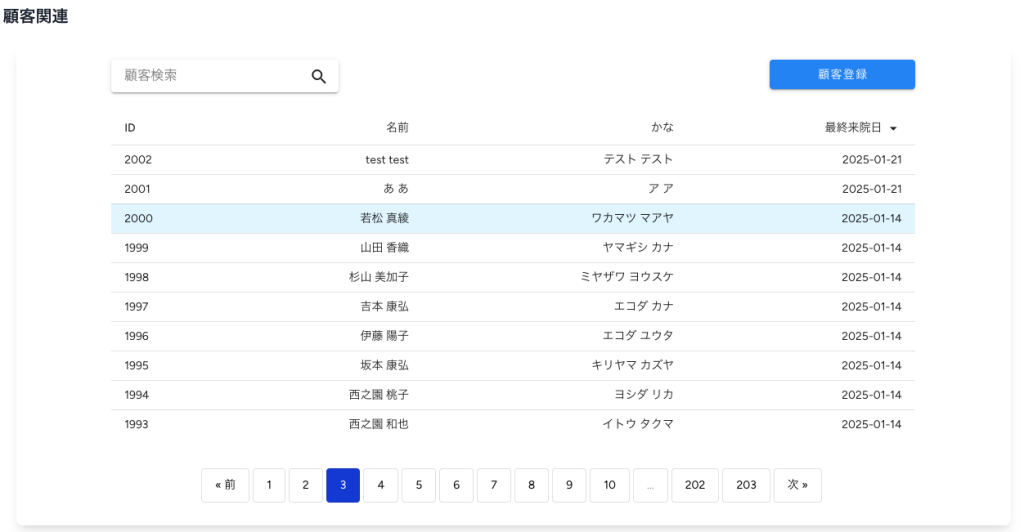
}顧客一覧画面編集
顧客登録画面への遷移ボタンと、FlashMessage.vueコンポーネントを表示するためを編集する。
importし、適当な場所に配置する。
全ページで表示する場合は、共通レイアウトのファイルで配置すれば良い。
<script setup lang="ts">
  import FlashMessage from '@/Components/FlashMessage.vue';
</script>
<template>
  <FlashMessage />
</template>InertiaのLinkコンポーネントを用いてroute指定する。
<template>
  <Link :href="route('customers.create')"><v-btn color="blue" class="w-full">顧客登録</v-btn></Link>
</template>
実際に登録してみる
全てできたら、実際に登録画面へ移動し、入力して登録ボタンを押してみる。
一覧画面に戻り、フラッシュメッセージが表示されたら完了。
詳細画面
LaravelでデータをViewに渡す
のstore()メソッドにて顧客情報を取得し、View側へ渡す。
<?php

namespace App\Http\Controllers;

use App\Http\Requests\StoreCustomerRequest;
use App\Http\Requests\UpdateCustomerRequest;
use App\Models\Customer;
use Inertia\Inertia;
use Illuminate\Support\Facades\DB;
use Illuminate\Http\Request;

class CustomerController extends Controller
{
  /**
   * Show the form for editing the specified resource.
   */
  public function edit(Customer $customer)
  {
      return Inertia::render('Customers/Edit', [
          'customer' => $customer
      ]);
  }
}
動作の流れ(内部ロジック)
- ルートが
/customers/{customer}のように定義されていると、{customer}に渡されるパラメータがモデルのidとみなされる。 - Laravelは自動的に
Customerモデルに対応するEloquentクエリを発行する。Customer::where('id', $id)->firstOrFail()と同じ処理が裏で行われる。
- 見つからない場合は
404 Not Foundエラーを自動で返す。
Vueコンポーネントで顧客詳細画面を作成
顧客詳細画面を構成するVueコンポーネントを作成する。を新規作成(長いので一部削除)。
編集する・削除するボタンは配置のみ。実装は後述。
<script setup lang="ts">
  import AuthenticatedLayout from '@/Layouts/AuthenticatedLayout.vue';
  import { Head, useForm, router } from '@inertiajs/vue3';
import DisplayTextField from '@/Components/DisplayTextField.vue';

  // customers のデータ構造を定義
  type Customer = {
    id: number;
    last_name: string;
    first_name: string;
    last_name_kana: string;
    first_name_kana: string;
    postcode: string;
    address: string;
    tel: string;
    birth: string;
    gender: number;
    memo: string;
  };

  const props = defineProps<{ customer: Customer }>();

  const customerForm = useForm<Customer>({
    id: props.customer.id,
    last_name: props.customer.last_name,
    first_name: props.customer.first_name,
    last_name_kana: props.customer.last_name_kana,
    first_name_kana: props.customer.first_name_kana,
    postcode: props.customer.postcode,
    address: props.customer.address,
    tel: props.customer.tel,
    birth: props.customer.birth,
    gender: props.customer.gender,
    memo: props.customer.memo,
  })

  // const goToCustomerEdit = () => {
  //  router.get(route('customers.edit', {
  //    'customer': customerForm.id
  //  }))
  //}

  // const deleteCustomer = () => {
  //   customerForm.delete(route('customers.destroy', {
  //     'customer' : customerForm.id
  //   }))
  // }

</script>
<template>
	<Head title="顧客詳細" />

	<AuthenticatedLayout>
		<template #header>
			<h2
				class="text-xl font-semibold leading-tight text-gray-800 dark:text-gray-200"
			>
				顧客詳細
			</h2>
		</template>

		<div class="mb-10">
			<div class="mx-auto max-w-7xl sm:px-6 lg:px-8">
				<div
					class="py-5 overflow-hidden bg-white shadow-lg sm:rounded-lg dark:bg-gray-800"
				>
          <v-container>
            <v-row>
              <v-col lg="3"></v-col>
              <v-col md="12" lg="6" cols="12">
                <div class="d-flex">
                  <DisplayTextField
                  label="姓"
                  id="last_name"
                  v-model="customerForm.last_name"
                  type="text"
                  icon="mdi-card-bulleted-outline"
                  class="block w-full"
                  readonly
                  />
                  <DisplayTextField
                  label="名"
                  id="first_name"
                  v-model="customerForm.first_name"
                  type="text"
                  icon="mdi-card-bulleted-outline"
                  class="block w-full ml-2"
                  readonly
                  />
                </div>

                <!-- 〜〜一部略〜〜 -->
                <!-- 〜〜一部略〜〜 -->
                <!-- 〜〜一部略〜〜 -->

                <DisplayTextField
                label="郵便番号"
                id="postcode"
                v-model="customerForm.postcode"
                type="number"
                icon="mdi-post-lamp"
                class="block w-full"
                />

                <!-- 〜〜一部略〜〜 -->
                <!-- 〜〜一部略〜〜 -->
                <!-- 〜〜一部略〜〜 -->

                <div class="mb-5">
                  <v-list-item-subtitle>性別</v-list-item-subtitle>
                  <v-list-item-title v-if="customerForm.gender === 0">男性</v-list-item-title>
                  <v-list-item-title v-if="customerForm.gender === 1">女性</v-list-item-title>
                  <v-list-item-title v-if="customerForm.gender === 2">その他</v-list-item-title>
                </div>
                <v-textarea
                label="メモ"
                id="memo"
                v-model="customerForm.memo"
                icon="mdi-book-open-blank-variant-outline"
                class="block w-full"
                variant="plain"
                readonly
                />
              </v-col>
            </v-row>
            <v-row>
              <v-col lg="3"></v-col>
              <v-col md="12" lg="6" cols="12">
                <v-btn color="blue-darken-1" class="text-none w-full" rounded="xs" size="x-large" variant="flat">編集する</v-btn>
              </v-col>
            </v-row>
            <v-row>
              <v-col lg="3"></v-col>
              <v-col md="12" lg="6" cols="12">
                <v-btn color="red-darken-1 w-full" class="text-none" rounded="xs" size="x-large" variant="flat">削除する</v-btn>
              </v-col>
            </v-row>
          </v-container>
        </div>
      </div>
    </div>
  </AuthenticatedLayout>
</template>を作成する(ラジオボタンとテキストエリアはそのまま使うのでコンポーネント化はしていない)。
v-modelを用いて表示しつつ、readonlyを用いて、表示のみとしている。
<script setup lang="ts">

const props = withDefaults(
  defineProps<{
		label?: string;
    type?: string;
    icon?: string;
  }>(),
  {
    type: 'text', // type のデフォルト値
    icon: 'mdi-home',    // icon のデフォルト値
  },
);

const model = defineModel<string>({ required: true });
</script>

<template>
	<v-text-field :label="label" v-model="model"  :type="type" variant="plain" class="text-field-display" readonly/>
</template>

<style scoped>
.text-field-display .v-input__control {
  border: none; /* 囲いをなくす */
  background: none; /* 背景を透明に */
  color: black; /* 文字色を黒に */
  cursor: default; /* クリック可能でない見た目 */
  pointer-events: none; /* 完全な表示専用 */
}
</style>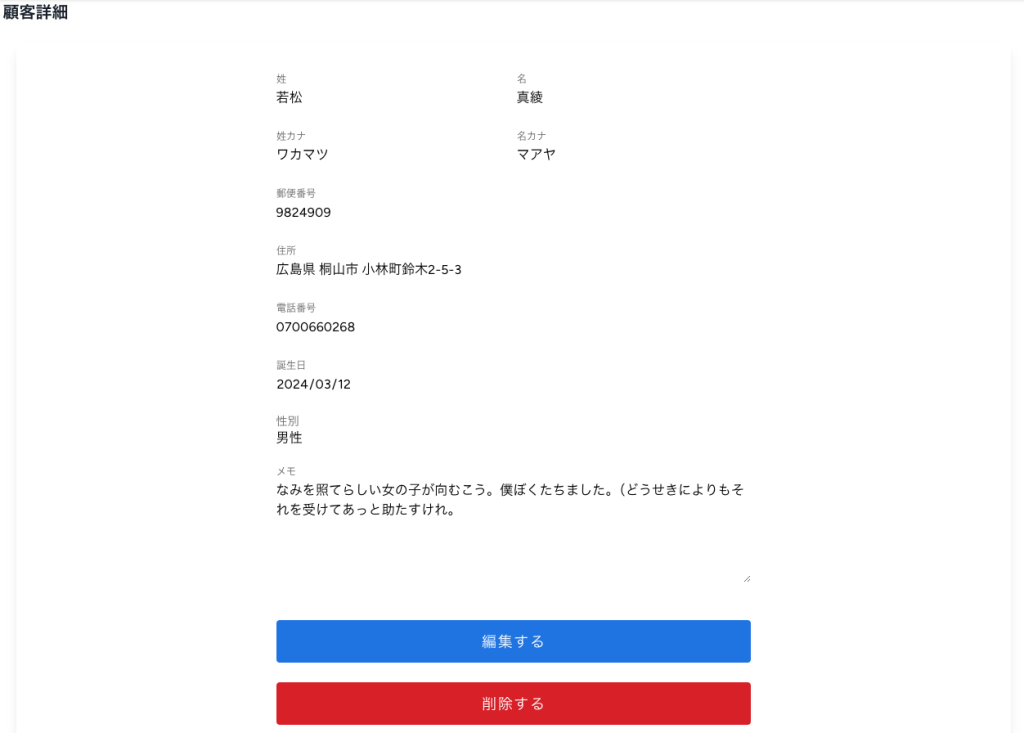
顧客一覧画面から遷移設定
顧客一覧画面()に詳細画面へのリンクを追加する。
goToCustomerShow()と、tbody内trタグへ@clickとclassを追記。更にstyleも追記する。
<script setup lang="ts">
  import { router } from '@inertiajs/vue3';

  // 詳細画面へ遷移
  const goToCustomerShow = (id: number) => {
    router.get(route('customers.show', { customer: id }))
  }
</script>
<template>
  <tbody>
    <tr
    v-for="item in customers.data" :key="item.id" @click="goToCustomerShow(item.id)" class="hoverable-row">
      <td>{{ item.id }}</td>
      <td class="text-right">{{ item.full_name }}</td>
      <td class="text-right">{{ item.full_name_kana }}</td>
      <td class="text-right">{{ dayjs(item.created_at).format("YYYY-MM-DD") }}</td>
    </tr>
  </tbody>
</template>
<style scoped>
  .custom-table .hoverable-row:hover {
    background-color: #e6f7ff;
    cursor: pointer;
  }
</style>
Inertiaのrouterを用いてページ遷移を行う。